I love this time of year. It’s warm and sunny and I can get my hands in the dirt. I could spend all day outside gardening or walking through nurseries.
My family really enjoys spending time in our backyard and we often BBQ and eat outside on our deck. My better half and I enjoy warm evenings with a glass of wine and just listening to the sounds of the neighborhood. Three houses down from us there is a park with a playground and you can hear children laughing and playing. Birds chirping. OK, that’s enough romancing. You get it.
Here’s the part I didn’t like. We are very exposed to the left side of our deck since it’s about 5 feet higher than grade. So I’ve been looking for a way to provide some privacy on that side. I’ve also been wanting to plant Wisteria for a long time, but our back yard is over gardened already (the previous owners were avid gardeners). I found the Wisteria plants with little effort, but I needed a rectangular planter and trellis that was 52 inches wide to fit the space. You see I wanted to remove the deck’s railing in that area and replace it with the Wisteria planter and trellis. I did find twig trellis that I thought I was going to have to make myself too, but for $12 each it made more sense just to buy two.

So not pretty!
After scouring most of my local area nurseries, home improvement stores and decor stores I finally gave up trying to find the appropriate sized planter. I decided because of the cost and size I had to make the planter myself. After doing some research and asking the advice of those knowledgeable folks at Home Depot I came away armed with my supplies.

Left to right – twig trellis, pre-cut wood boards, cedar boards
Supply List:
- Three 12 inch by 48 inch pre-cut laminated pine boards to form the front and back and the bottom of the planter.
- One 12 inch by 36 inch pre-cut laminated pine boards. These had to be cut to size to form the sides of the planter.
- Four 6 foot cedar boards with rounded edges. These boards form the decorative portion of the planter and offer additional weather proofing and structural support to the pine.
- Water resistant decking screws. Screws tend to bind to the wood better than nails and I have an electrical driver instead of a automatic nail gun. Maybe next Mother’s Day I’ll ask for a nailer. It’s important to use rust proof screws or they will rust and get those nasty looking rust stains.
- I use garbage bags as the inner lining. Put the liner in place with staples.
- And my favorite tool, the electric mitre saw.
Build the simple box first. This part takes little effort since I had to cut the sides only, the rest was pre-cut to size. Always pre-drill the screw holes so not to split the wood, especially the pine since it’s a soft wood.

Simple rectangle box -48″ wide by 12″ deep by 12″ high
Cut the cedar boards based on the finished measurements. I didn’t measure instead I used the other cedar pieces to act as the finished cutting guide. This is super easy and it’s more accurate than measuring.
You do have to measure for half inch reveal at the top of the planter (it just looks nicer) and half inch at the bottom. Securing the cedar a half inch beyond the box planter creates the planter’s feet which allows for air flow. This air flow will make the wood planter last longer and keeps the deck boards from rotting out in that area from constant moisture.
Before planting add a plastic liner on the inside to create a moisture barrier for the pine. Again, this goes a long way in keeping the planter looking and functioning better longer. I screwed the twig trellis to the back of the planter and used garden wire to tie the two trellises together for more support.
A Wisteria plant requires full sun, so my west facing deck couldn’t be in a better spot. Add good planter potting soil. Potting soil is lighter than regular soil and supposedly with more nutrients. I’ve always used planter potting soil in my outdoor containers with good results. I was concerned about transferring the Wisteria because I’ve never planted it before so I used Miracle Grow’s (not sponsored) transplanting and first feed fertilizer. It’s been 48 hours and the flowers are starting to sprout, so it must have worked! Yeah!
Here is the finished product. In a few weeks it should be a better privacy provider, even now it’s a lot prettier than what was there before.
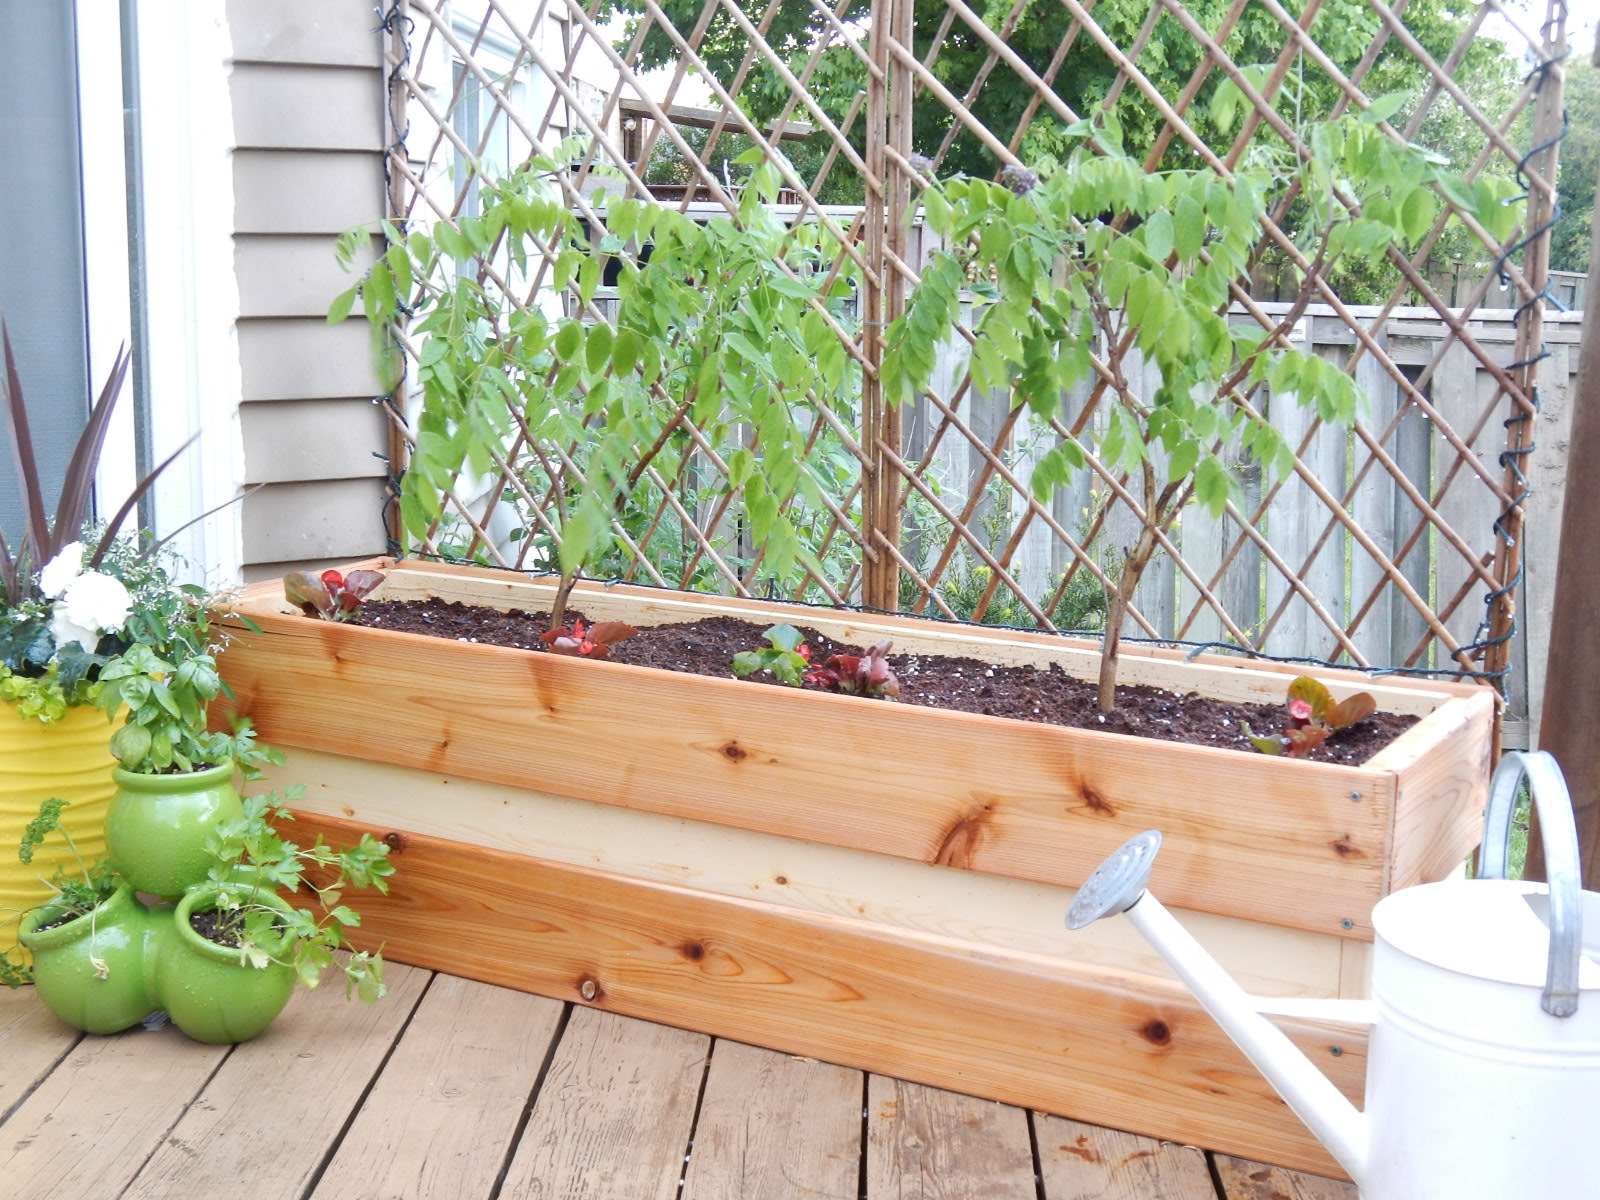
DIY deck planter with privacy trellis
I decided to leave the plant container unpainted. It was recommended not to paint the planter and let it weather which removes any factory finish.


I love using lights in the backyard at night. I’ve recommended on previous posts to buy outdoor light strings at after Christmas sales in bulk. LED light strings are the most cost effective to operate and I had a few battery pack LEDs to choose from. I weaved a LED string around the trellis for maximum impact. Great fun and great for evening entertaining.

Trellis with LED string


I love this project! I am also impressed that you made it. I love the idea of the lights adding to the frame too. It will look fabulous this summer!
Thanks Thea. See, I can DIY with the best of them! Ha
So much better than the standard lattice privacy. The greenery will add so much to your deck!
Yes, I see you are as tired of standard lattice as I am!
That’s going to be some great privacy in a little while! I’ve been thinking of doing this to the side of our house to make it look less boring.
I know what you mean. I was so sick at looking at the same hand rails. My deck has some odd angles so it just seemed like there was more to look at. This planter and trellis really broke it up and created a enjoyable focal point.
Awesome privacy screen, I love this type of thing, it’ll just keep getting better and better! Your tutorial is totally doable, thanks for sharing!
Thanks for your kind words. 🙂
This is a great solution. That wisteria is going to look gorgeous. Lucky you already have blooms! I have one and I have been waiting years for it to bloom!
I’d love to take credit for the blooms but the plant had buds on it when I got from the nursery.